Flux Headers Documentation
Flux Headers offers 100 expertly designed, fully customizable header layouts tailored for Divi. From sleek and minimal to bold and creative, these headers provide the flexibility to enhance your website’s navigation and aesthetics.
This documentation guides you through importing, customizing, and applying the headers to your site, helping you create a professional and responsive design with ease.
Installation
Download Layout Pack
Import into Divi Library
Import into Theme Buider
Installing RTL headers
Customization
Modify CSS and Script
Change the Logo
Update Drawer Content
Customize Search Drawer
Header with Mega Menu
Set Up Default Mega Menu
Custom Mega Menu Setup
Customize Mega Menu Rows
For Header Style 48
For Header Style 71
For Header Style 78
Vertical Header
Set Up and Customization
For Header Style 65
For Header Style 69
Important Note
Installation
Step 1
Download the Layout Pack
- Once you’ve purchased Flux Headers, you will receive a
.zipfile containing all 100 header layouts in.jsonformat. - Extract the
.zipfile to access the individual.jsonfiles.
After extracting the .zip file to your computer, you’ll find four folders:
- Layouts & RTL Layouts: This folders contains the
.jsonfiles for sets of 10 headers. - Sections & RTL Header Section: In this folders, you’ll find individual
.jsonfiles for each header.
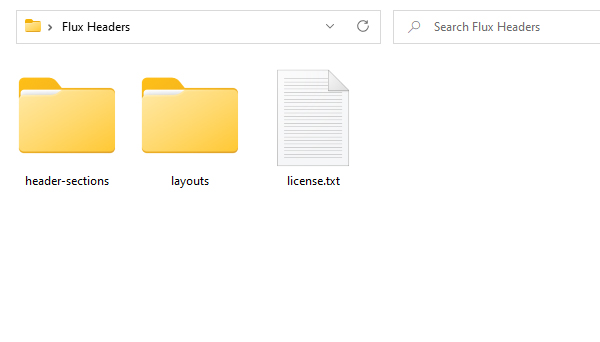
You can choose to import either a set of 10 headers or a single header based on what you need.
Step 2
Import Layouts into Divi Library
- In the WordPress dashboard, navigate to Divi > Divi Library.
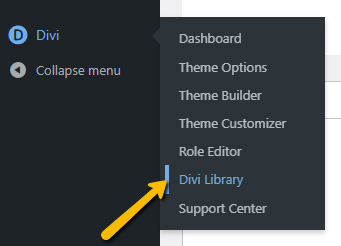
- In the Divi Library, click on the Import & Export button at the top.
- In the pop-up window, click on the Import tab.
- Click Choose File and select the .json file for the header layout you want to import.
- Once selected, click on the Import Divi Builder Layouts button.
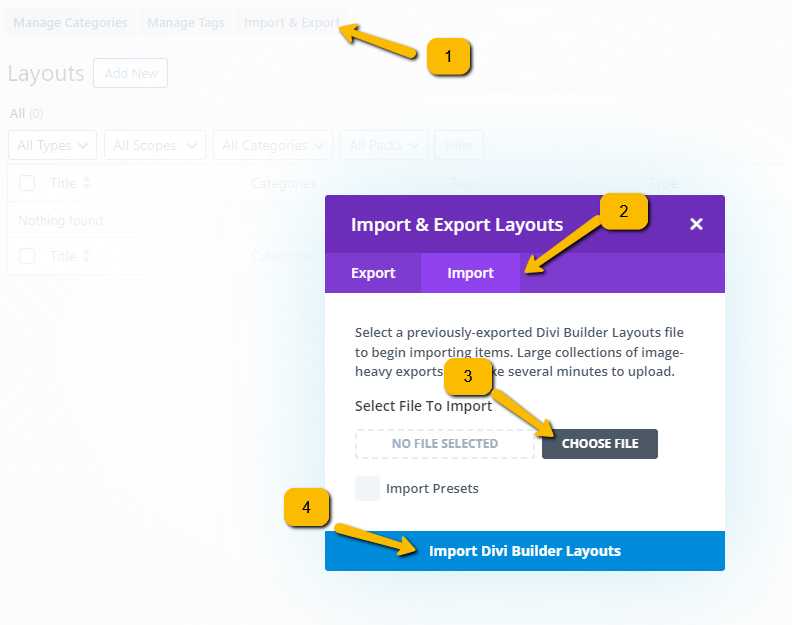
Wait for the import process to complete. You should now see the header layouts listed in your Divi Library.
Step 3
Import Header in Divi Theme Builder
- Navigate to Divi > Theme Builder.
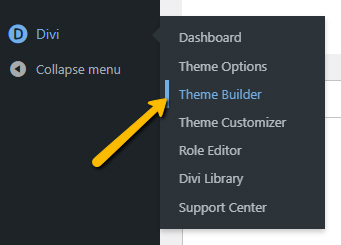
- In the Theme Builder, click on Add Global Header >Build Global Header.
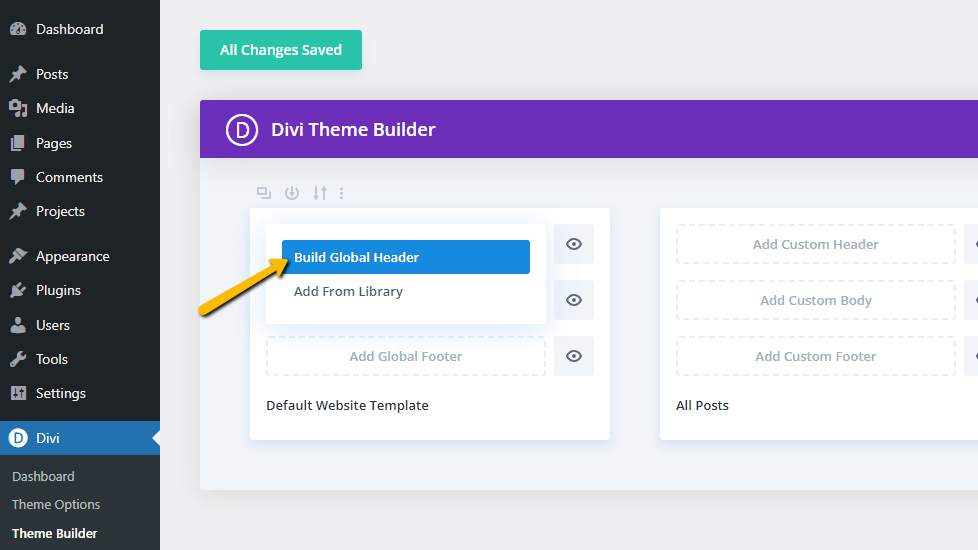
- Click the blue “+” button to add a new section.
- Select “Add From Library.”

- Choose the layout you want to use from the list of imported layouts.

- Click Save, and when you return to the Theme Builder, click Save Changes again to finalize your changes.
Installing RTL Headers
The RTL headers are provided in a separate file to prevent you from importing all the layouts onto your website at once.
After extracting the .zip file to your computer, you will find two folders:
1. rtl-layouts: This folder contains .json files that group sets of 10 headers.
2. rtl-header-sections: This folder includes individual .json files for each header.

You can choose to import either a complete set of 10 headers or a single header, depending on your needs.
To install the RTL header layouts, simply import the relevant file into the Divi Builder Layouts.
Customization
Customizing the headers in Flux Headers is easy. After adding a layout to your site, you can change things like colors, fonts, and spacing to fit your brand. You can also rearrange sections, add or remove items like text and images, and update the content to match your needs. This flexibility makes sure your headers look great while perfectly matching your website’s style.
Modify Custom CSS and Script
Some of the header layouts in the Flux Headers include additional CSS and scripts added directly to the code module. If you want to make further changes, locate the code module in your header layout.
By clicking on the module, you’ll be able to access both the custom CSS and any scripts. From here, you can edit the code to adjust styles or enhance functionality as needed.

Change the Logo Image
Changing the logo in your header layout varies based on the specific header design you’ve selected.
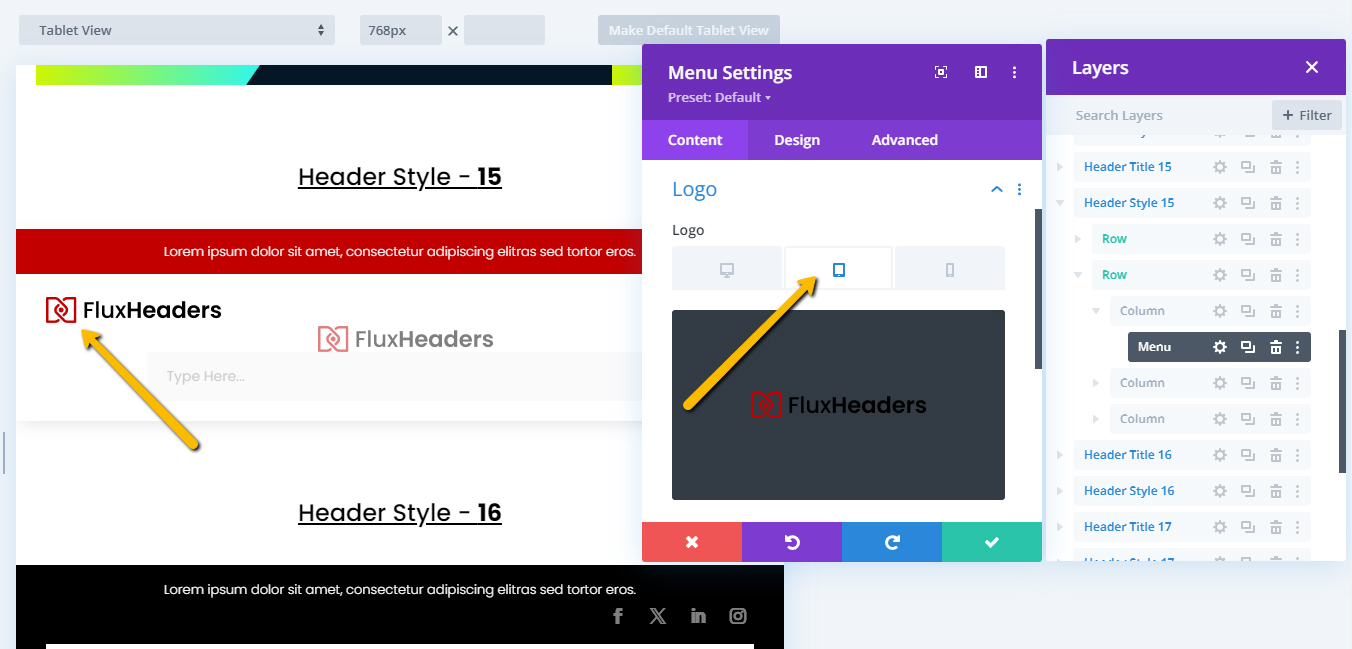
For headers that use the Menu Module for the logo, you can update the logo by following these steps:
- Open the Menu Module settings.
- Navigate to the Logo tab.
- Upload your desired logo image from your media library.
For headers that utilize the Image Module for the logo:
- Access the Image Module settings.
- Select or upload your logo image directly in the module.
In some layouts, both the Menu Module and Image Module are used. In these cases, we’ve implemented the Visibility feature of the Divi theme to control which logo appears on different devices. You can customize these settings in the module options.
Update Drawer Content
To update the content of the slide drawer in your header layout, follow these steps:
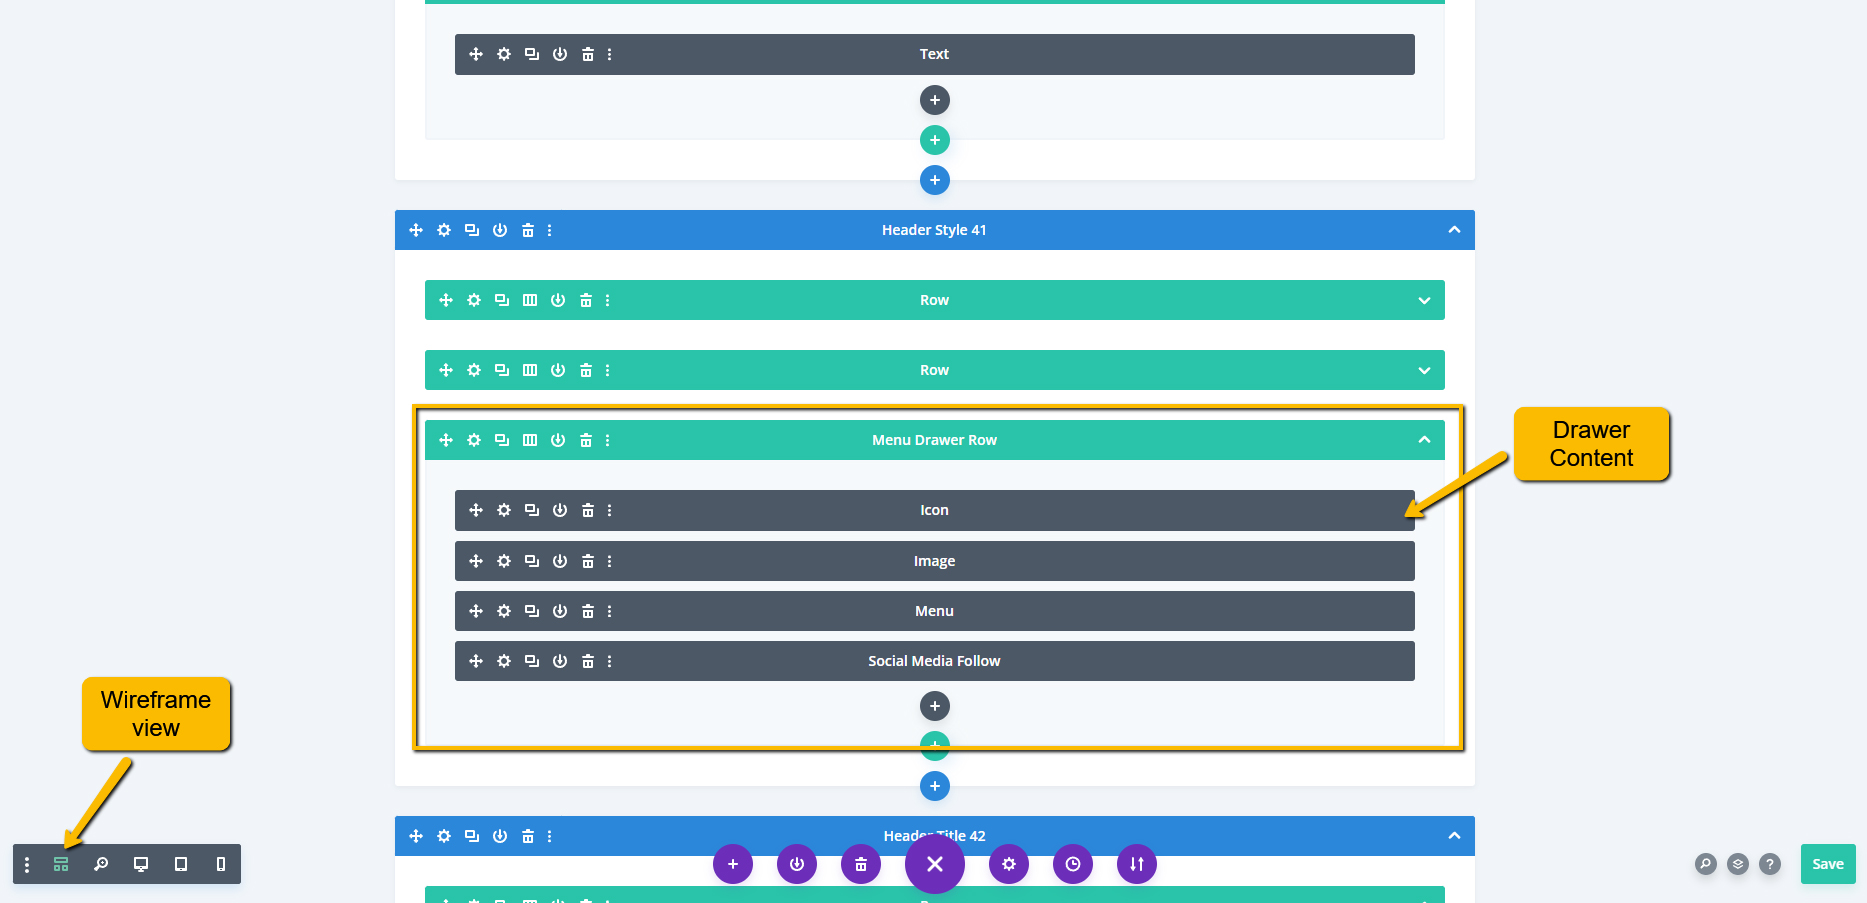
- In the Divi Builder, switch to the Wireframe View. This allows you to see all the modules and sections in a structured format.
- Locate the slide drawer, typically labeled as Menu Drawer Row.
- Click on the module to open its settings and modify the content, including text, images, and other elements.
- Once you’ve made your updates, be sure to save the changes.
Customize Search Drawer
- Switch to Wireframe Mode in the Divi Builder.
- Locate the rows labeled as Search Box Raw.
- Update the content styles by using Divi’s modules, to match your website design.

Header with Mega Menu
Some headers in the Flux Headers come with built-in Mega Menus for advanced, multi-column navigation. Header styles 46 to 50, 64, 71, 76, 83, 89 and 98 feature this functionality. This guide will show you how to set up and customize the Mega Menu to suit your needs.
- First, navigate to Appearance > Menus in your WordPress dashboard.
-
Create or edit your desired menu.
- Go to Screen Options (top-right) and check CSS Classes to enable the CSS Classes field.
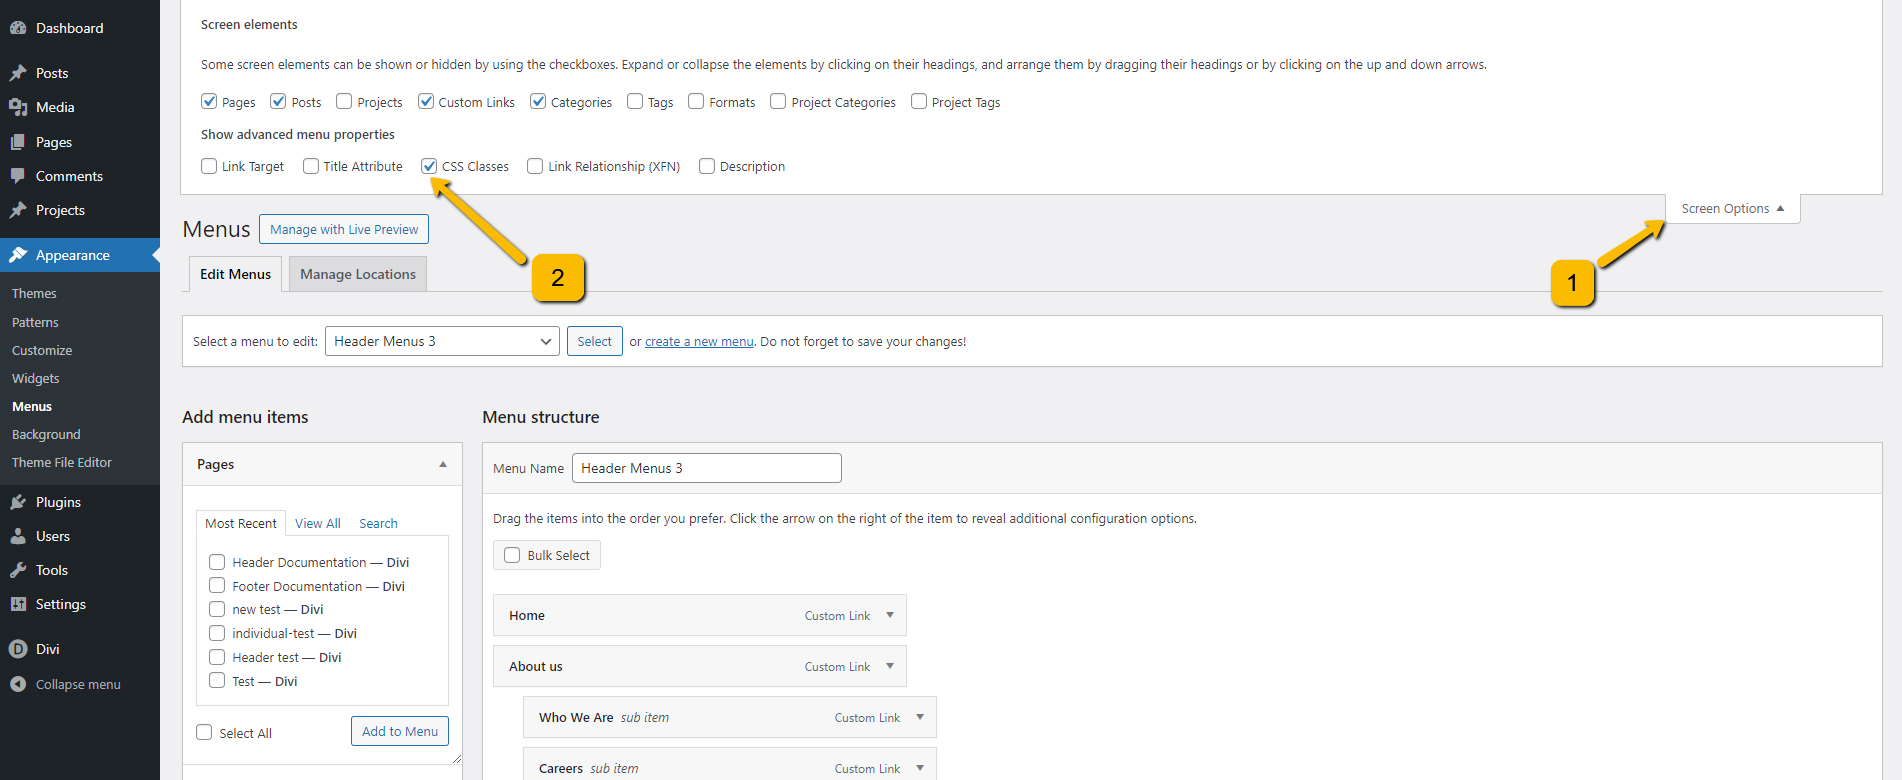
- To enable the Mega Menu functionality, simply add the class “mega-menu“ to the menu item. This will automatically trigger the default Mega Menu layout, giving you multi-column functionality without additional configurations.
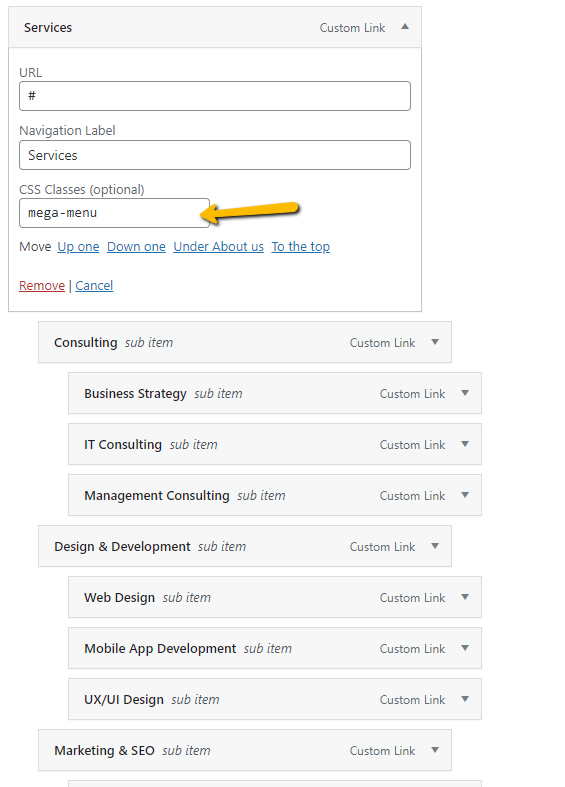
- In your WordPress dashboard, go to Appearance > Menus and then create or edit your desired menu.
- To enable the CSS Classes field, go to Screen Options (top-right) and check CSS Classes.
- Add the class “mega_menu_1” (or any numbered variation) to your menu item.
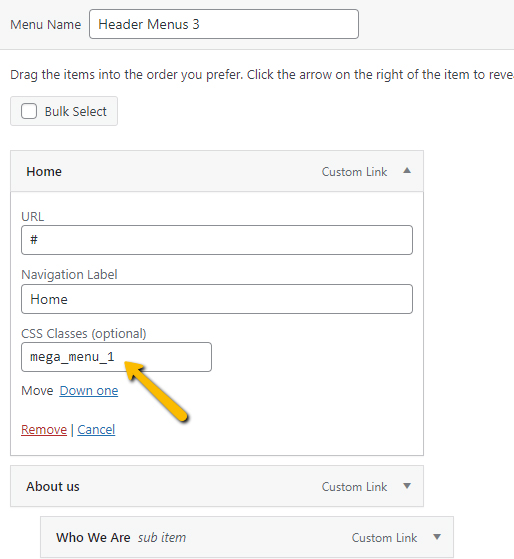
- Switch to Wireframe Mode in the Divi Builder. This will give you a clear, simplified view of the layout structure.
- Locate the rows labeled with names like “mega_menu_row_1“, which correspond to the Mega Menu class you assigned in Appearance > Menus (e.g., “mega_menu_1”).
- Ensure that the class of the row matches the Mega Menu class for proper functionality.
- Update the content in each row by using Divi’s modules, such as text, images, or icons, to match your desired design.
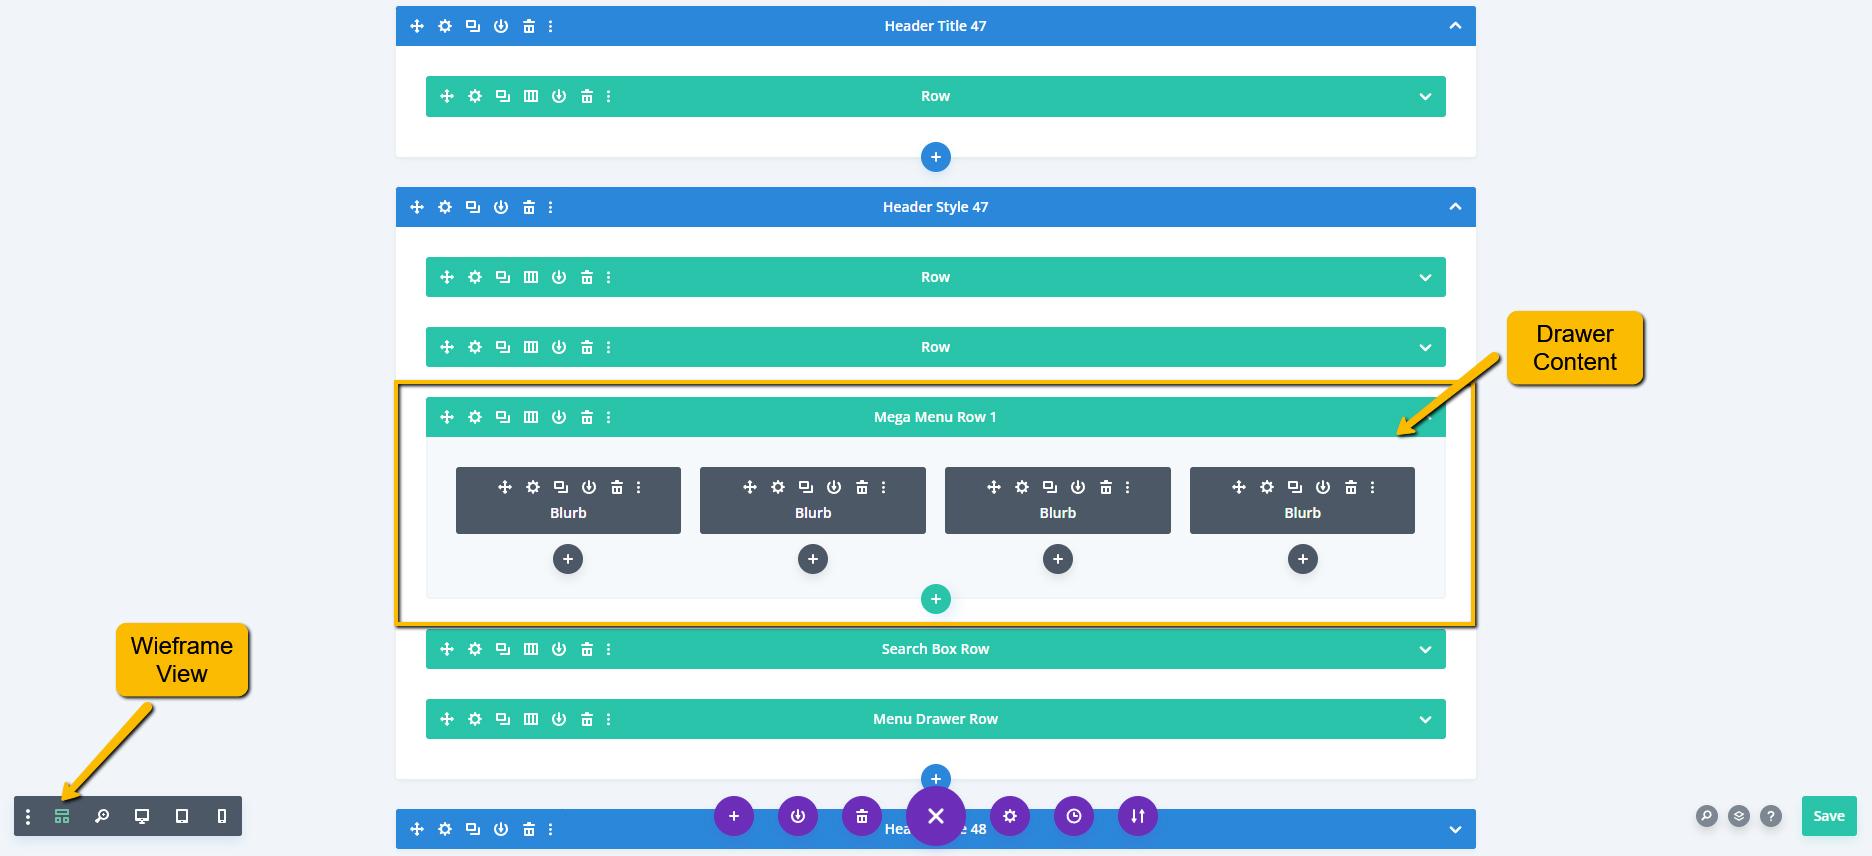
For Header Style 48
For the mega menu functionality in header style 48, “mega_menu_1” (or any numbered variation) class is added to the Blurb Module. If you want to customize it follow this steps:
- locate the Blurb Module in the Divi Builder and open the settings.
- Navigate to the Advanced tab.
- In the CSS Class field, enter “mega_menu_1” (or any numbered variation) .
- Ensure that the mega menu row class corresponds to the mega menu class (e.g., if the Blurb Module has “mega_menu_1”, the row class should be “mega_menu_row_1”).
- Save your changes.
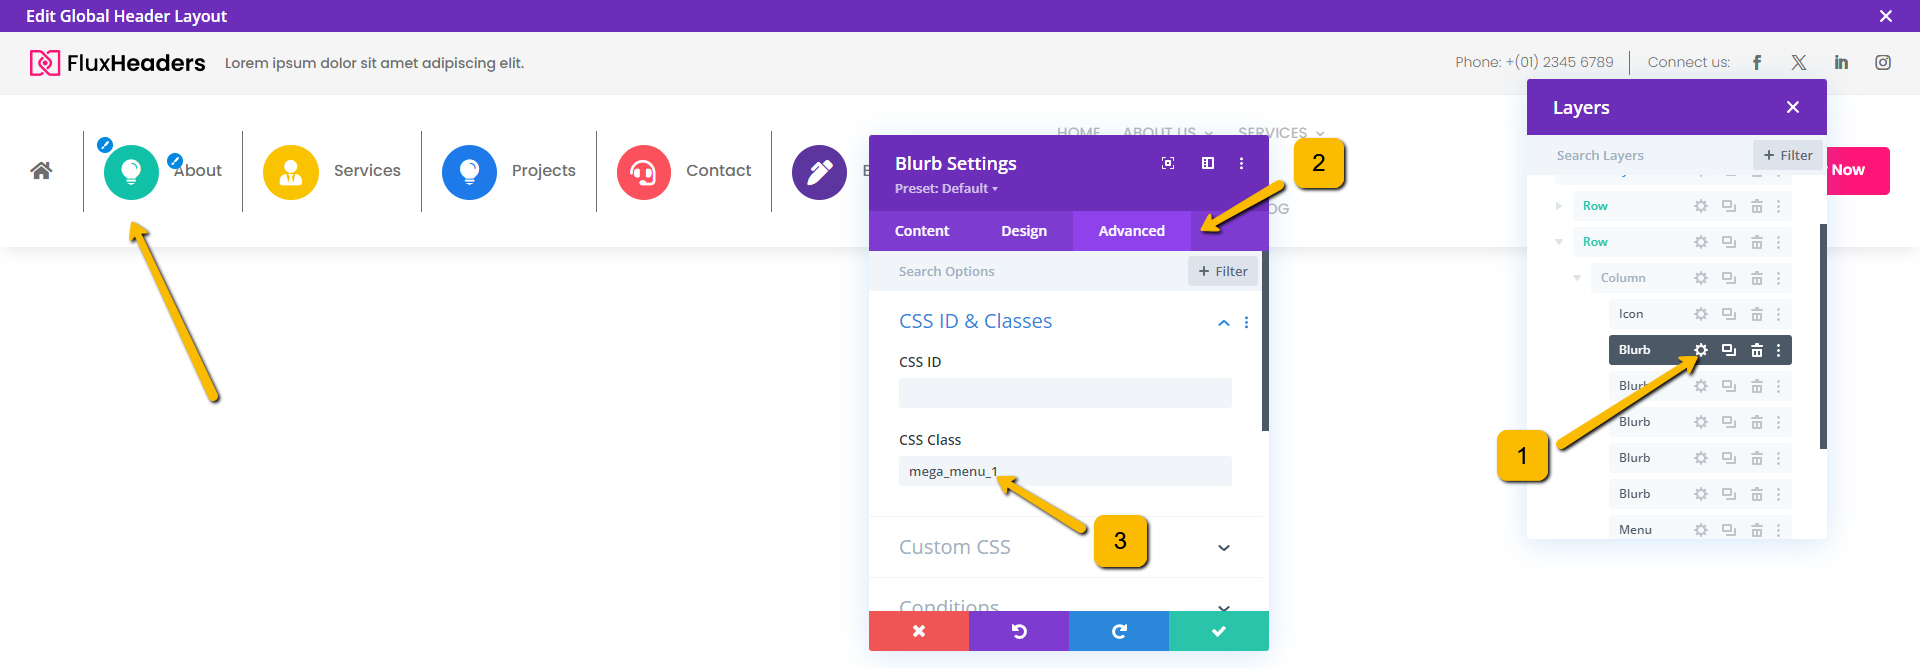
For Header Style 71
In header style 71, the “mega_menu” class is directly applied to the Blurb Module, similar to header style 48. This enables the built-in Mega Menu functionality.

For Header Style 78
To change the menu link icon in header style 78, follow these steps:
1. Open the following link: https://www.elegantthemes.com/blog/resources/elegant-icon-font.
2. Scroll down the page until you reach the icon list with their Unicode values, as shown in the screenshot below.
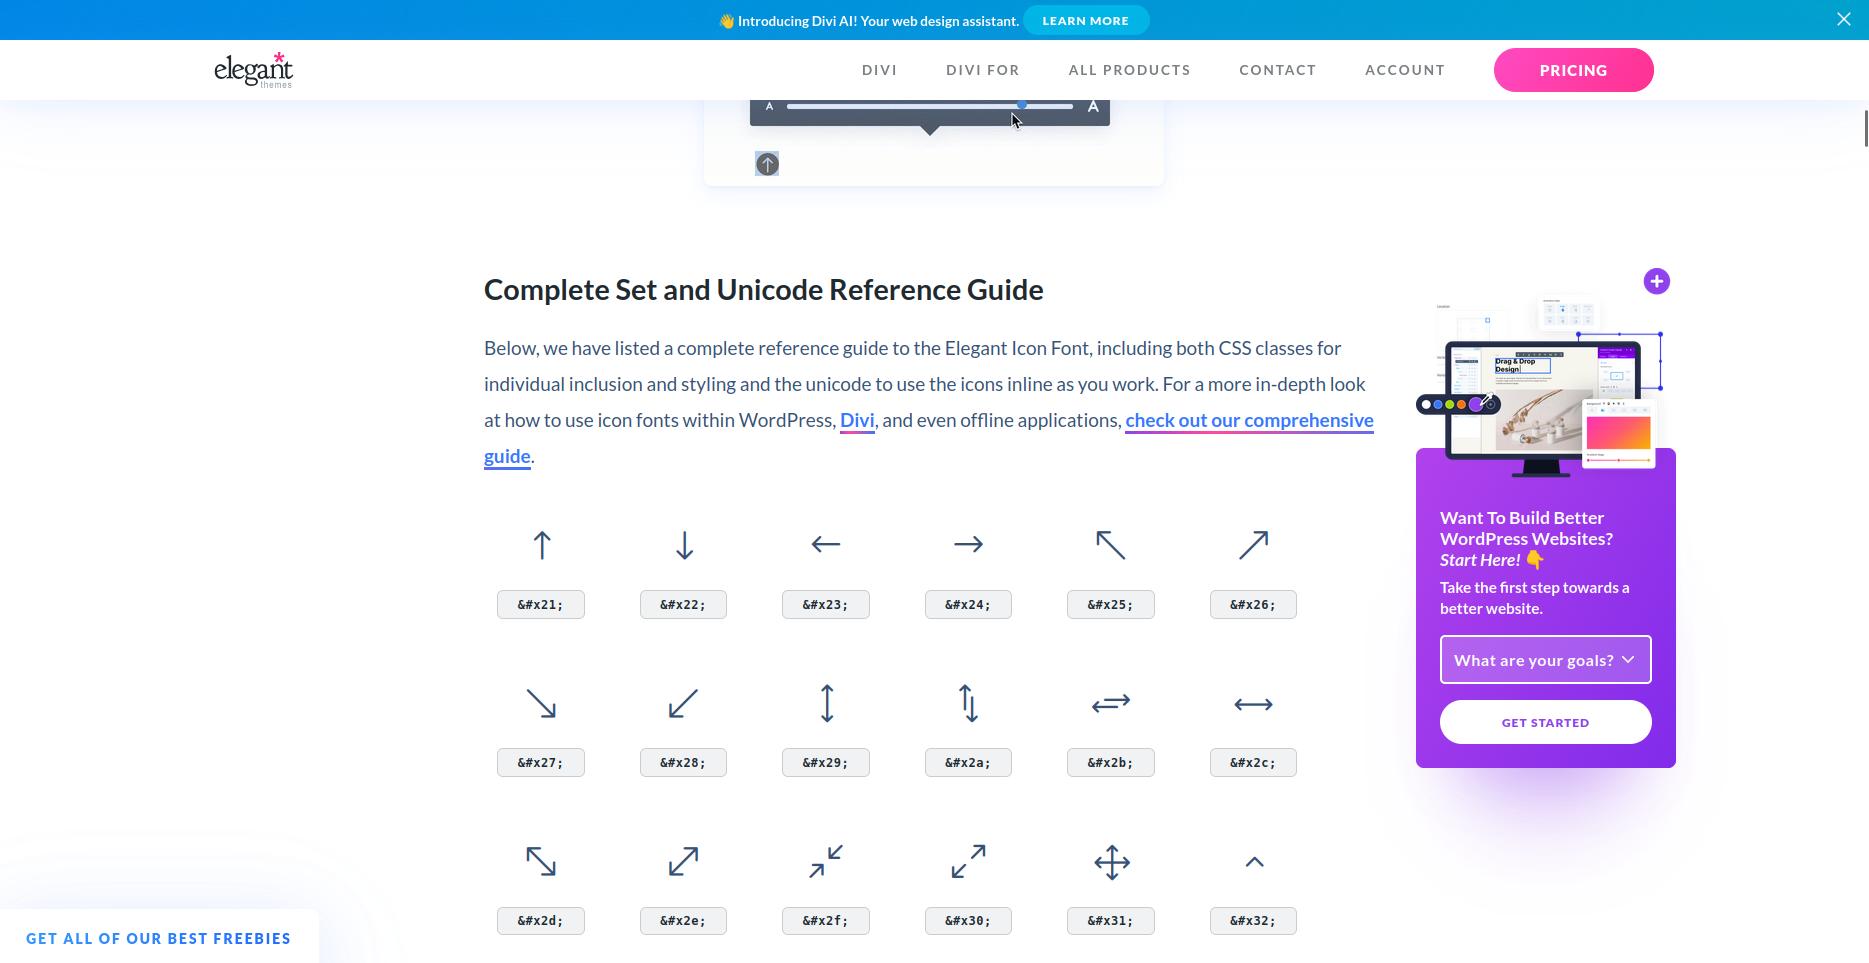
3. Open the WordPress admin dashboard and navigate to Appearance -> Menus and then create or edit your desired menu.
4. Add or edit menu items and then add “<span></span>” before your item label in Navigation Label.
5. Replace your copied Unicode into the span of the navigation label.
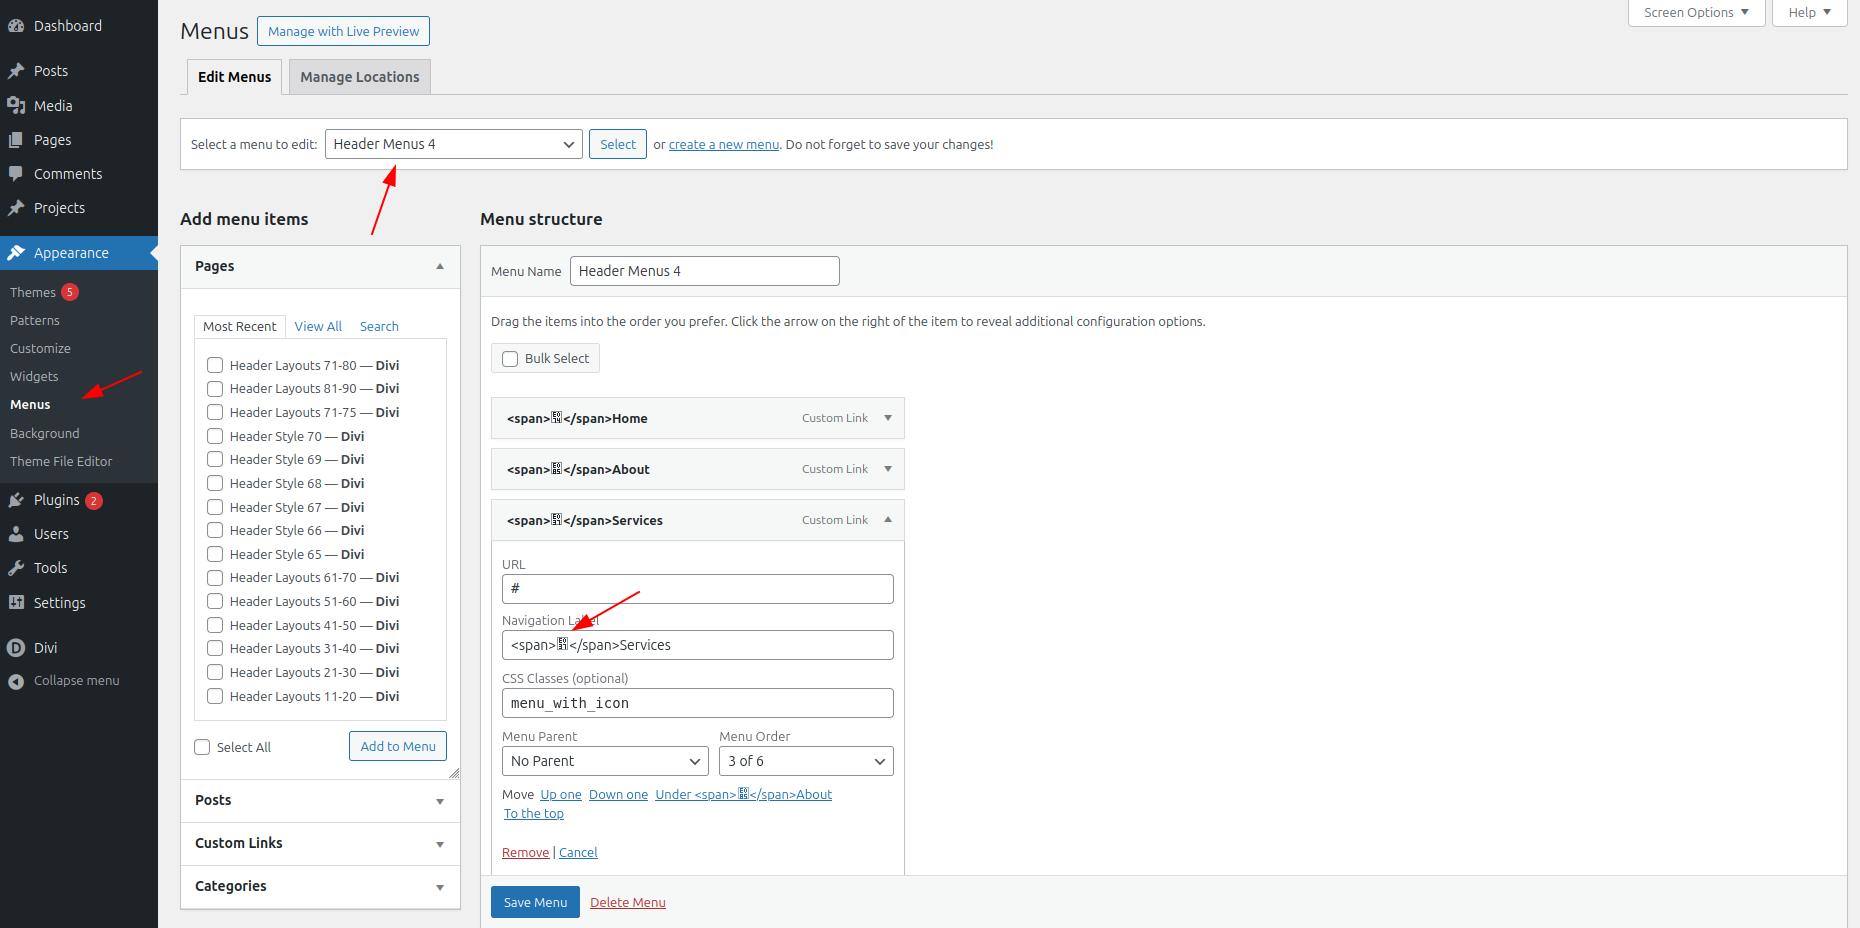
6. Save the changes.
Vertical Header
Headers in styles 65 to 70 of the Flux Headers feature a vertical layout with a fixed position. This guide will help you set them up, customize the content, and ensure they display correctly on your site.
Set Up and Customization
- After adding the vertical header section, switch to Wireframe Mode in the Divi Builder.
- Locate the “Row” that contains the main header content. This row is set to a fixed position and has a specified width to ensure the header stays on the side of the page with the correct dimensions.
- Open the settings of the “Row” and check the width value. Ensure the width is set according to your design needs.
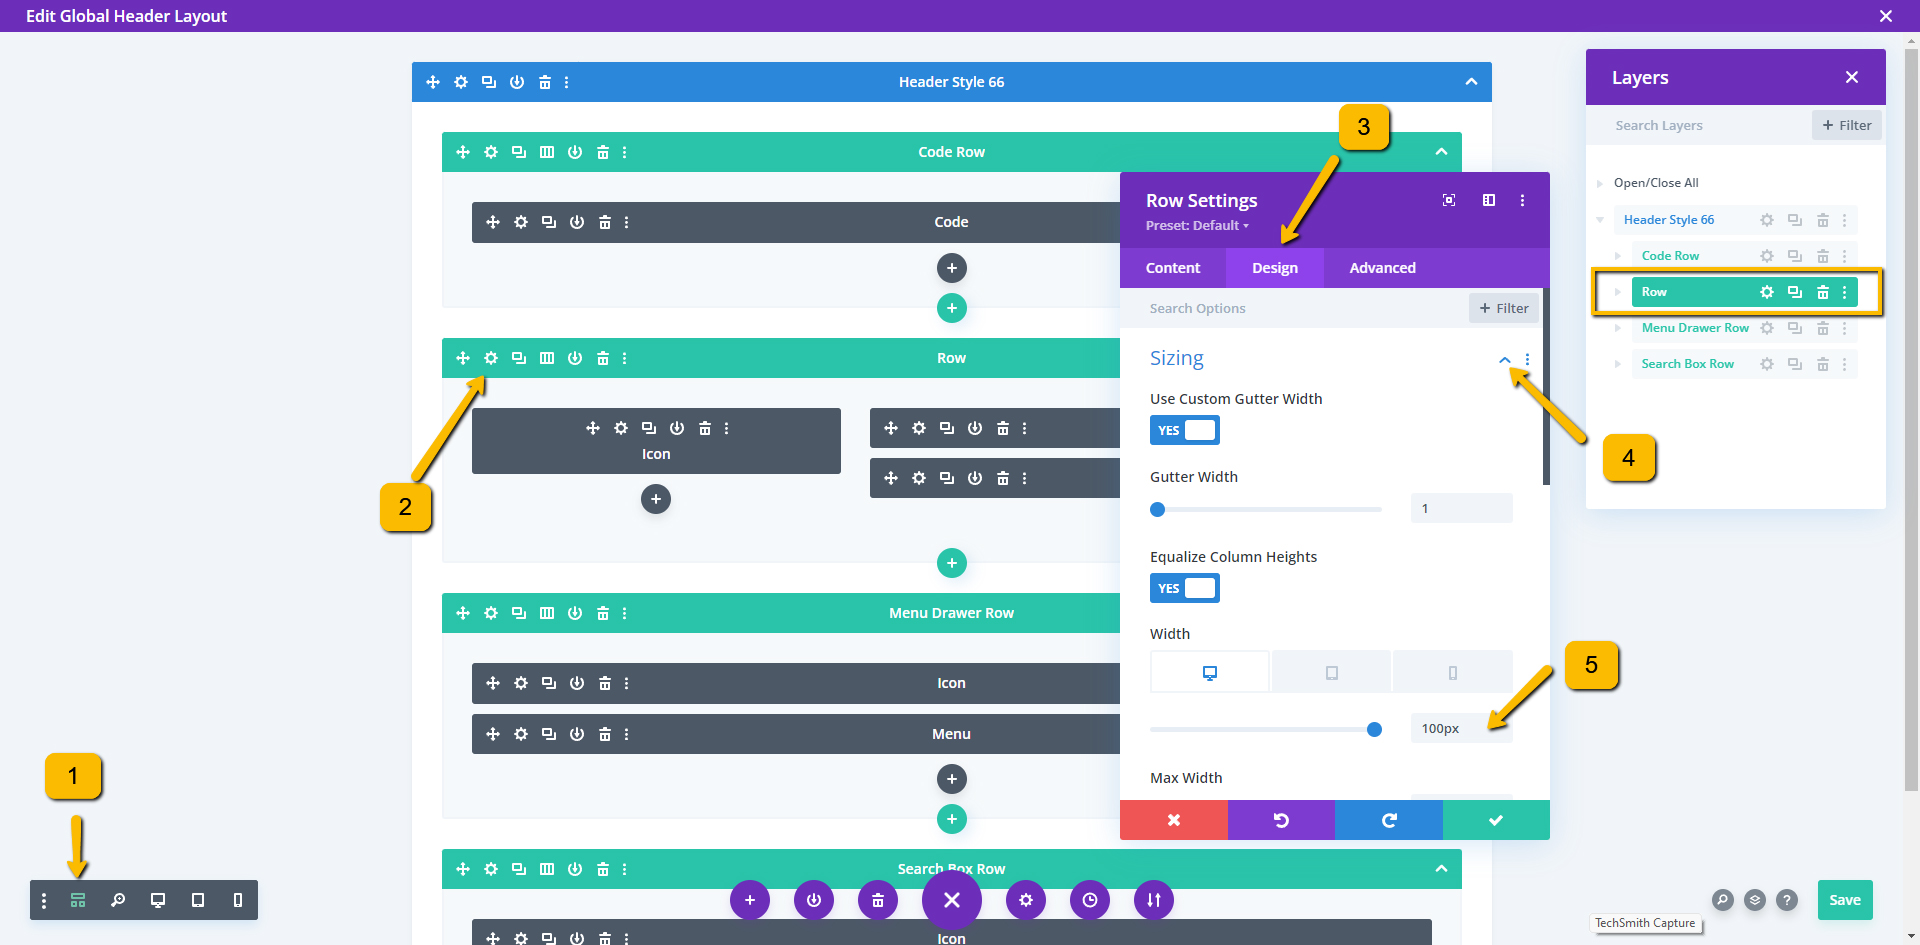
- Next, add the CSS to adjust the body margin based on the width of the row:
- Go to Divi > Theme Options > Custom CSS and add the following css:

- Replace
[row-width]with the exact width value you set for the row (e.g.,100px).
- For customization, Locate the “Code Row” to modify any custom CSS or scripts, edit the “Row” to adjust main header content, modify the “Menu Drawer Row” for the slide drawer content and customize the “Search Box Row” for the search drawer, ensuring all elements fit your design and work across different devices.
- Then, Save the changes.
For Header Style 65
- In header style 65, a custom CSS is applied to the Menu Drawer Row to manage its sliding behavior. The CSS is as follows:
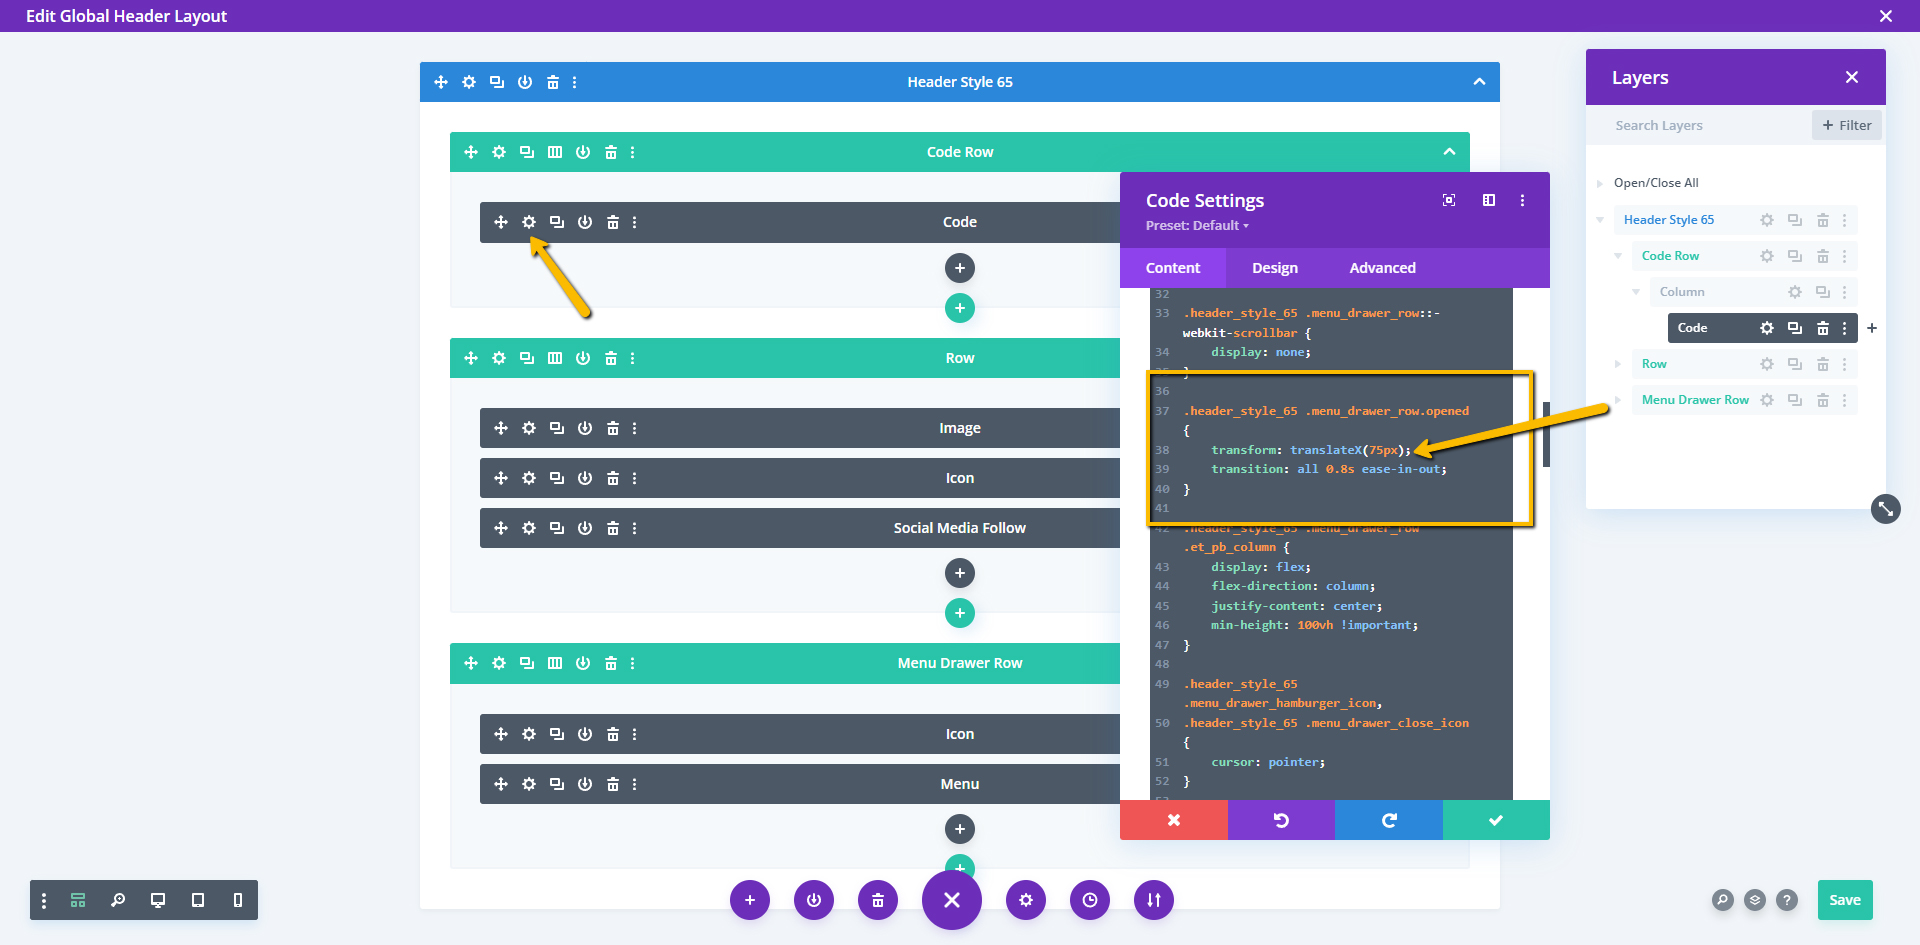
- When you update the width of the “Row”, make sure to adjust the
translateXvalue accordingly to match the new width of the row for consistent sliding. For example, if the row width changes to 100px, update the CSS to:
transform: translateX(100px);
For Header Style 69
In header style 69, which is positioned on the right side, you need to add the following CSS to set the body margin:
This margin should match the width of the “Row”. If you change the width of the row, make sure to update the margin-right value accordingly to ensure proper spacing and alignment.
Important Note
When using a vertical header from the set of 10 layout bundles (Header Layouts 61-70.json), ensure you set the position to fixed for the “Row.” However, it’s recommended to use individual headers instead of selecting from the layout bundle for better customization and control.